Ok, talked to some of my sewing students, and the biggest request out right now is for a tank-top tutorial. Since clothing isn't my strong-point, this is extremely challenging, but thanks to the web...we have help! I've reviewed this particular tutorial, and it's pretty darn close to how I was planning to explain it all. Using this help plus a few things I think my particular students need to know/address...here we go!
http://www.youtube.com/watch?v=Bxhh1MLsxCg
OK. Now that you've watched said video...read my points.
1. Use a thinner paper (or even use scrap cloth like muslin)....posterboard is expensive, and extremely hard on your scissors. If I find out you used your fabric scissors to cut your pattern, I'm going to be terribly unhappy. :(
2. She doesn't address the issues between the fronts and backs of our bodies. Boobies (yes, using that word now) take up room. Boobies and style should be accounted for.
a. On the pattern piece for the back (yes, make a second one), cut the neckline higher than the neckline for the front. This will make your tank look more like what you'll get from a purchased pattern.
b. Between the front and the back, the arm holes should look slightly different. The ones for the front should be dipped down just a bit more. Easiest way to learn this is to cut your first one the way she does, try it on, and don't feel upset if it needs a bit of adjusting. The thinner you are, the less likely you are to notice the need for this. To make the adjustment, keep the same marking points, but make the curve in the armhole a bit deeper, and slightly more towards the center of the bust of the shirt, not just towards the "fold line" of the pattern. In her pattern, it's more towards the center of her neckline. Bigger busted girls should also raise their neckline slightly for modesty. This will keep coverage. You can always make it deeper, but can't add fabric back once it's cut off.
3. Make sure to note that the edge of the paper (or line you've pre-drawn) is the FOLD line. You fold your fabric in half, and this edge goes even with your fold on your fabric. If you accientally cut your fabric here, you're going to have a lot of fix work, that in some cases, is more expensive than it's worth.
That gets the pattern done.
NOW to the fun part of sewing it! Once you've cut your two pieces (one front, one back), the next step is assembly. The side seams and shoulders...sew those with the 5/8" seam allowance. If you're using a knit (receommended if you're following her pattern method), you need to use a zig-zag stitch. Remember that this fabric will stretch, and your stitch needs to stretch as well. To hem the bottom, fold up the bottom edge twice to meet the hemline from your pattern, pin, and use the zigzag stitch on your machine to stitch at the edge of your folds to secure. To secure the edges of the sleeves and neckline, it's pretty much the same process...you need to use a zigzag. You need to test your stitches on scraps of the same material, and see how they perform over different areas of the fabric. You want to test diagonally across, horizontally, and vertically on the fabric. Some knits work differently depending on the direction. You want to make sure your stitches look good, as well as don't come out before you wear your tank out on its first wear.
Showing posts with label Sewing Machine. Show all posts
Showing posts with label Sewing Machine. Show all posts
Thursday, January 23, 2014

Monday, June 10, 2013
7 Months in the making...

The photo on the left is of the original guild members, and the one on the right is current as of 2013. There is an Established Date block in the lower right hand (it's in place of an 8th block). The center is also embroidered in two different shades of silver. There are also 7 hand-pieced/hand assembled pink dogwood blooms in the center block. The quilt was quilted with clear monofilament thread on top and grey cotton underneath. The quilt also has a false back covering the white back of the quilt. This false back uses pink, grey and white fabrics from the front of the quilt. I put it there to protect the quilt for many years of wear hanging in the guild house. The binding is white, and hand-sewn.


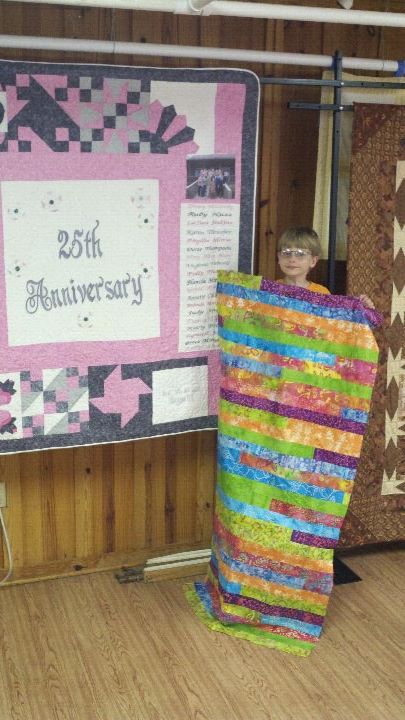
Now, to make things even more interesting, my little boy has just finished his first quilt top! I normally don't share people photos, but this was too good not to share.
 He started this quilt top back in December after prodding me for a couple of years to let him machine sew. He's always been proud of buttons I've let him sew on or embroidery work I've let him do (all by hand), but he's been longing to get behind a machine and use an amazing power tool. And yes, I just called sewing machines power tools.....I rather love my power tools.... but moving on....
 He was extremely proud to hold his quilt up in front of mine to show his ties to an even greater legacy I hope he's really starting to understand. I should have known when just over a year or two ago he watched in amazement as I made a couple of purses as Christmas gifts that he'd be using one of my old machines by now.
His exact words regarding the purses: "When I grow up, I want to sew purses for people just like you, Mommy!"
Whilst this definitely isn't a bag of any sort, it's something that he'll keep and cherish for a lifetime. He already knows that it's hard work and plans to hang the completed quilt on the wall in his room after it's made a few quilt show rounds!


Tuesday, April 2, 2013
I NEED!!!????@@@????!!!!
The local group of bloggers that I've joined in (even for my relatively unknown blog) has posted a challenge, and I figured I'd try to answer the questions, mixed in with my sewing and quilting time.


What do I need? (Hence the multiple expression marks in the post's title...and throughout the post)
Of course, then I ask myself,
"Self, what about sewing and quilting time?"
"The time I'm supposed to be using for sewing and quilting! Yes, I need more!!!"
"When do I get that time back, Self?"
"When you are sleeping and wish to not be, and succeed!"
Now, pretend that I didn't just tell myself to start quilting and sewing instead of sleeping.....yep....I said pretend. Whilst my desk may be cluttered and unconventionally accumulating "stuff" right now, the rest of my sewing studio/office isn't that bad right now. I promise! I didn't say it is spectacularly clean. I said NOT THAT BAD.....
So, right now, I need TIME to work on sewing/quilting projects and get them completed....
....and yes, please pretend also that I didn't just talk to myself through my blog where everyone can see it....
.....to be continued...
Wednesday, February 20, 2013
Beans? Really?

The shocking part wasn't even the stray piece of elbow macaroni I found with the beans, or the straight pins I found. The issue with finding beans, macaroni, and straight pins all in the same location isn't even that surprising (any house with young kids has seen stranger things).
The LOCATION is the shock-inducing surprise of all of this. A completely FULL 1/4 cup of dried beans inside a sewing machine. Not inside the carrying case. Not in the accessory case. INSIDE the machine. Touching the motor. Correction, covering the motor (based on the placement of the motor and shape of the case.
The lady to whom this machine belongs claims that when they had mice problems while living in Minnesota, they found all sorts of dried food items that they didn't belong (in storage totes, etc.). I didn't find any droppings anywhere inside the carry case, machine, or elsewhere. Thankfully.
But yes, please, please, PLEASE! Keep little fingers, toes and teeth (human or not) away from your machine. No matter how thirsty you claim your machine is, I've never seen a sewing machine digest anything but sewing machine oil. Dry food typically doesn't count!
Ahhh....not Monday, but worth the wait!
Subscribe to:
Posts (Atom)